25 lines
3.2 KiB
Markdown
25 lines
3.2 KiB
Markdown
<img src="https://user-images.githubusercontent.com/30338980/182388263-f69cb425-56a2-4b70-89dd-52ae4b0bda3c.png" width="70" /> <img src="https://user-images.githubusercontent.com/30338980/182389009-98f48692-3752-4e14-9a2a-4f16fbe152f3.png" width="70" />
|
|
## How to make your dumb IR controlled air conditioner smart in Home Assistant!
|
|
Most solutions in making air conditioners smart require a remote control with a screen. This solution does not need that.
|
|
#### This is also working in HomeKit!
|
|
|
|
### What do you need?
|
|
To control your air conditioner and get feedback you need a univeral infrared remote control and a smart plug that can measure the power consumption. Do do this I used:
|
|
- A broadlink RM Mini 3 to send the IR command to the AC
|
|
- A NOUS A1 with Tasmota to measure the current energy consumption
|
|
- A zigbee temperature sensor
|
|
|
|
### How to set it up?
|
|
1. First of all, the IR remote control must be integrated into Home Assistant. With the RM mini 3, the integrated Broadlink plugin could be used.
|
|
2. Then the IR remote control of your air conditioner must be learned to the remote control. To do this with a broadlink Device, follow the steps from the [Home Assistant Broadlink plugin page](https://www.home-assistant.io/integrations/broadlink/). Create a [remote.send_command script](https://github.com/hxcde/make-dumb-ac-smart/blob/a3aee4818590ab5310621d7640286f65e2a27881/make_dumb_ac_smart#L6) to send the command to the AC.
|
|
3. Now the smart plug must be integrated into Home Assistant. Follow the instructions of the plugin you need.
|
|
4. Create a [binary_sensor](https://github.com/hxcde/myhassconfigs/blob/ad97530c21af6a94b9b02c949569915ce940f58e/makethingssmart/ac/make_dumb_ac_smart#L28) that detects if the device is on or off based on the energy consumption.
|
|
5. Now create a [switch](https://github.com/hxcde/myhassconfigs/blob/ad97530c21af6a94b9b02c949569915ce940f58e/makethingssmart/ac/make_dumb_ac_smart#L16) consisting of the [binary_sensor](https://github.com/hxcde/make-dumb-ac-smart/blob/a3aee4818590ab5310621d7640286f65e2a27881/make_dumb_ac_smart#L28) and the [remote.send_command script](https://github.com/hxcde/myhassconfigs/blob/ad97530c21af6a94b9b02c949569915ce940f58e/makethingssmart/ac/make_dumb_ac_smart#L6). This can switch the air conditioner, and can detect its state.
|
|
6. Last, a [generic_thermostat](https://github.com/hxcde/myhassconfigs/blob/ad97530c21af6a94b9b02c949569915ce940f58e/makethingssmart/ac/make_dumb_ac_smart#L39) must be created. To do this, enter the switch entity and the temperature sensor entity in the config. All the settings can be found [here](https://www.home-assistant.io/integrations/generic_thermostat/).
|
|
7. To add it to Homekit, just add it to the [homekit config](https://github.com/hxcde/myhassconfigs/blob/adef80644e38d652a4d81ddd885fea02e7198bbe/makethingssmart/ac/make_dumb_ac_smart#L54).
|
|
|
|
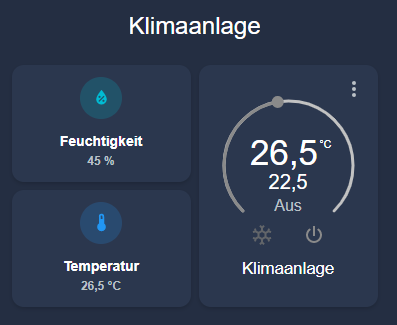
### Pictures:
|
|
 <img src="https://user-images.githubusercontent.com/30338980/182390258-8fe0e627-c0f9-4b88-81ae-d4de0498711e.jpeg" width="192" />
|
|
|
|
This card config can be found [here](https://github.com/hxcde/myhassconfigs/blob/main/makethingssmart/ac/ac_dashboard_card).
|